Create cluster manually (from single-server installation)
Sometimes it is the case that a single server installation, where all IQ4docs components are installed on one computer, must be extended to a form cluster. In the following we will talk about this installation as the first cluster node (server1).
For fail-safe operation, MongoDB and RabbitMQ should be installed on at least 3 servers. The use of an odd number of servers here is mandatory – using more than 3 servers is not essential but will increase the overall performance to some extent. With an even number of servers, if a connection is broken, there is no guarantee in every case that the remaining parts will be able to decide, based on a majority of nodes, whether the role of the primary node can be delegated. This then requires manual intervention and contradicts the overall concept.
The tool must always be run on the server that is to be added to the cluster.
On the servers that are to expand the system to form the cluster (server2 and server3), install the IQ4docs (if there was already a RabbitMQ or MongoDB installation on these machines, remove all remnants of these installations (directories, .erlang.cookies...) before the installation).
Now create a cluster of the new RabbitMQ installations with the first cluster node.
Repeat the following steps for the other cluster nodes (at least server3).
In a single server installation, the same .erlang.cookie is always created, so this step is only necessary for a cookie defined in the installer.
RabbitMQ nodes are only allowed to communicate with each other if the .erlang.cookies match.
- To do this, copy the .erlang.cookie from the first cluster node (e.g. C:\Users\Administrator\.erlang.cookie) and replace all .erlang.cookies on server2 with that of the first cluster node. These can be found in:
- System profile directory (e.g. c:\windows\System32\config\systemprofile)
- User directory of the user doing the installation (e.g. C:\Users\Administrator)
- Then restart Server2.
Whether the .erlang.cookie used is the same can be compared in the RabbitMQ log (IQ4docs installation_directory\RabbitMQ\RabbitMQ\logs) under the cookie hash entry.
Now open a command line on server2 with administrator rights.
Go to the cluster directory of the RabbitMQ installation (<installation_path>\RabbitMQ\Cluster).
Now connect the RabbitMQ installation on server2 to the first cluster node using the command line command RabbitMqCluster -c Add -h Server2 -r Server1 -d "<installation_path>\RabbitMQ\RabbitMQ\sbin".
The RabbitMqCluster --help command provides information about the possible functions and further commands.
Something like this appears:
stopping rabbit application on node rabbit@server2 ...
joining cluster rabbit@server1
Clustering node rabbit@server2 with rabbit@server1 ...
[...]
restart RabbitMQ service
applying policy for HA mode
To check whether the clustering operation was successful, log on to RabbitMQ from one of the connected servers.
- To do this, open the URL http://localhost:15672 in the browser and log in (default values: username: admin and password: admin).
- The nodes are displayed in the overview (this may take some time). If they are permanently displayed as Node not running, restart the service on server2 and server3.

In order for the RabbitMQ data to be highly available, they must be synchronized between the cluster nodes. To do so requires that the ha-mode (highly available mode) be activated and applied to all queues of the services. Temporary queues and DeviceGui queues are not synchronized and are given a different policy.
- To create the policies, open the URL http://localhost:15672 in the browser and log in (default values: username: admin and password: admin).
- Open the Admin area and click Policies on the right side.
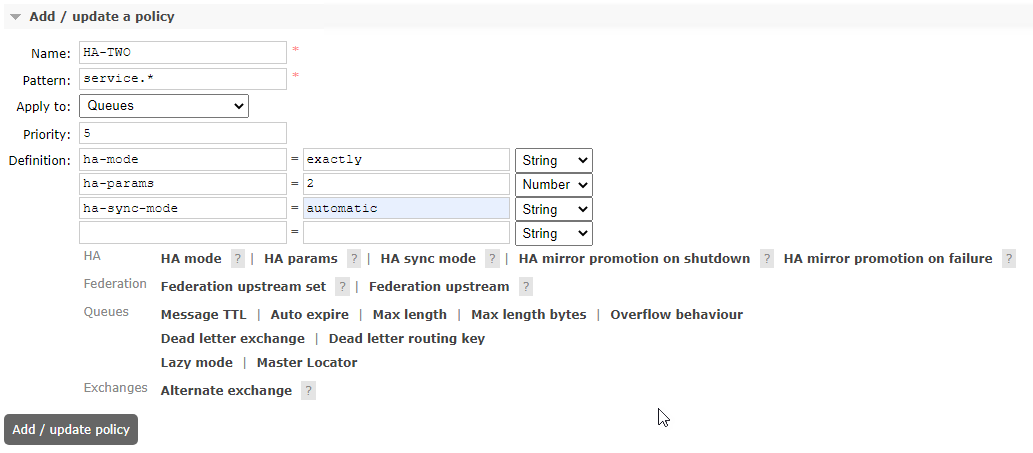
- Create the 3 policies shown below.
| Name | Pattern | Apply to | Definition | Priority |
|---|---|---|---|---|
| HA-TWO | service.* | Exchanger and queues | ha-mode: exactly (String) ha-params: 2 (Number) ha-sync-mode: automatic (String) |
5 |
| DeviceGui | ^deviceservice.deviceclient.gui\. | queues | message-ttl: 5000 (Number) | 10 |
| TempQueues | [0-9a-fA-F]{8}- | queues | message-ttl: 5000 (Number) expires: 120000 (Number) |
10 |
The picture shows an example of the creation of the HA-TWO policy.
After the policies have been created, they are displayed in tabular form.
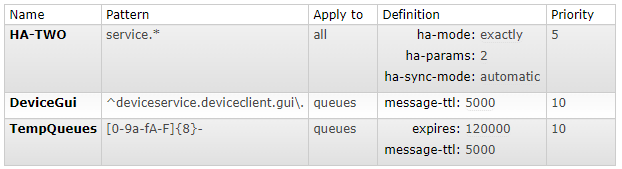
Specify the policies exactly as shown in the table. A deviation of only one character can impair the function.
Which policy the queues are subject to can now be seen under Features.
The following steps must be repeated for all other new servers (at least Server3).
On Server2, stop the MongoDB service in Windows Services.
Delete the contents of the MongoDB database directory in the <installation_directory>\MongoDB\Data\db.
Now open a command line on server2 with administrator rights.
Go to the cluster directory of the MongoDB installation (<installation_path>\MongoDB\Cluster).
Now connect the MongoDB installation on server2 to the first cluster node server1 using the command line command MongoDBCluster -c Add -h Server2 -r Server1 -d "<installation_path>\MongoDB".
The command MongoDBCluster --help provides information about the possible functions and further commands.
MongoDB independently determines which nodes are PRIMARY and which are SECONDARY (there is no "master" cluster node in MongoDB).
If the error Not enough voting nodes responded. Failed with received heartbeat is shown, then the DB content was not deleted. In our installer, an rs.initiate() command is executed, which prevents the clustering of DBs among themselves.
Something like this appears:
mongodb config is already modified
stopping IQ4docsMongoDB
starting IQ4docsMongoDB
rs.status is :
{
"set" : "Workflow",
"date" : ISODate("2017-11-06T12:46:14.861Z"),
"myState" : 1,
"term" : NumberLong(1),
"heartbeatIntervalMillis" : NumberLong(2000),
"members" : [
{
"_id" : 0,
"name" : "server1:27017",
"health" : 1,
"state" : 1,
"stateStr" : "PRIMARY",
"uptime" : 6123,
"optime" : {
"ts" : Timestamp(1509966526, 1),
"t" : NumberLong(1)
},
"optimeDate" : ISODate("2017-11-06T11:08:46Z"),
"electionTime" : Timestamp(1509966314, 2),
"electionDate" : ISODate("2017-11-06T11:05:14Z"),
"configVersion" : 3,
"self" : true
},
{
"_id" : 1,
"name" : "server2:27017",
"health" : 1,
"state" : 2,
"stateStr" : "SECONDARY",
"uptime" : 5936,
"optime" : {
"ts" : Timestamp(1509966526, 1),
"t" : NumberLong(1)
},
"optimeDate" : ISODate("2017-11-06T11:08:46Z"),
"lastHeartbeat" : ISODate("2017-11-06T12:46:13.691Z"),
"lastHeartbeatRecv" : ISODate("2017-11-06T12:46:14.150Z"),
"pingMs" : NumberLong(0),
"syncingTo" : "W2012DEV4:27017",
"configVersion" : 3
},
{
"_id" : 2,
"name" : "server3:27017",
"health" : 1,
"state" : 2,
"stateStr" : "SECONDARY",
"uptime" : 5847,
"optime" : {
"ts" : Timestamp(1509966526, 1),
"t" : NumberLong(1)
},
"optimeDate" : ISODate("2017-11-06T11:08:46Z"),
"lastHeartbeat" : ISODate("2017-11-06T12:46:14.578Z"),
"lastHeartbeatRecv" : ISODate("2017-11-06T12:46:10.127Z"),
"pingMs" : NumberLong(0),
"configVersion" : 3
}
],
"ok" : 1
}
On the servers that are to expand the system to form the cluster (server2 and server3), install the IQ4docs (if there was already a RabbitMQ or MongoDB installation on these machines, remove all remnants of these installations (directories, .erlang.cookies...) before the installation).
Now create a cluster of the new RabbitMQ installations with the first cluster node.
Repeat the following steps for the other cluster nodes (at least server3).
In a single server installation, the same .erlang.cookie is always created, so this step is only necessary for a cookie defined in the installer.
RabbitMQ nodes are only allowed to communicate with each other if the .erlang.cookies match.
- To do this, copy the .erlang.cookie from the first cluster node (e.g. C:\Users\Administrator\.erlang.cookie) and replace all .erlang.cookies on server2 with that of the first cluster node. These can be found in:
- System profile directory (e.g. c:\windows\System32\config\systemprofile)
- User directory of the user doing the installation (e.g. C:\Users\Administrator)
- Then restart Server2.
The .erlang.cookie used can be compared in the RabbitMQ log (IQ4docs installation_directory\RabbitMQ\RabbitMQ\logs) under the cookie hash entry.
Now open a command line on server2 with administrator rights.
Go to the sbin directory of the RabbitMQ installation (<installation_path>\RabbitMQ\RabbitMQ\sbin).
Stop the RabbitMQ application (the RabbitMQ service must continue running):
- rabbitmqctl.bat stop_app
Something like this appears: Stopping rabbit application on node rabbit@server2 ...
If an error occurs here, it could be because the HOMEDRIVE was not found. In this case set the HOMEDRIVE manually to c: (set HOMEDRIVE=c:).
Now connect the RabbitMQ installation on server2 using rabbitmqctl.bat join_cluster rabbit@<hostname of first clusternode> to the first cluster node. Make sure that the hostname - including upper and lowercase - matches exactly and that this name can be resolved.
The command rabbitmqctl join_cluster uses the short name of the hostname by default. For the FQDN, the parameter --longnames must be specified in advance (command syntax: rabbitmqctl [--node <node>] [--longnames] [--quiet] join_cluster).
- rabbitmqctl.bat join_cluster rabbit@server1
- or rabbitmqctl.bat --longnames join_cluster rabbit@server1.hostname1.local
Something like this appears: Clustering node rabbit@server2 with rabbit@server1 ...
Restart the RabbitMQ application:
- rabbitmqctl.bat start_app
Something like this appears: Starting node rabbit@server2 ...
If an error occurs while starting the application, restart the RabbitMQ service and perform this step again.
To check whether the clustering operation was successful, log on to RabbitMQ from one of the connected servers.
- To do this, open the URL http://localhost:15672 in the browser and log in (default values: username: admin and password: admin).
- The nodes are displayed in the overview (this may take some time). If they are permanently displayed as Node not running, restart the service on server2 and server3.
In order for the RabbitMQ data to be highly available, they must be synchronized between the cluster nodes. To do so requires that the ha-mode (highly available mode) be activated and applied to all queues of the services. Temporary queues and DeviceGui queues are not synchronized and are given a different policy.
- To create the policies, open the URL http://localhost:15672 in the browser and log in (default values: username: admin and password: admin).
- Open the Admin area and click Policies on the right side.
- Create the 3 policies shown below.
| Name | Pattern | Apply to | Definition | Priority |
|---|---|---|---|---|
| HA-TWO | service.* | Exchanger and queues | ha-mode: exactly (String) ha-params: 2 (Number) ha-sync-mode: automatic (String) |
5 |
| DeviceGui | ^deviceservice.deviceclient.gui\. | queues | message-ttl: 5000 (Number) | 10 |
| TempQueues | [0-9a-fA-F]{8}- | queues | message-ttl: 5000 (Number) expires: 120000 (Number) |
10 |
The picture shows an example of the creation of the HA-TWO policy.
After the policies have been created, they are displayed in tabular form.
Specify the policies exactly as shown in the table. A deviation of only one character can impair the function.
Which policy the queues are subject to can now be seen under Features.
The following steps must be performed on all servers (server1, server2 and server3).
The database to be replicated (workflow) must be specified in the configuration of MongoDB.
Add the following lines at the end of the configuration file mongod.cfg (in the directory <installationpath>\MongoDB):
replication:
replSetName: "Workflow"
The mongod.cfg must not contain any empty lines or tabs (except at the very end).
For the settings made so far to take effect, the MongoDB services must be restarted. Start the first cluster node (server1) first and then server2 and server3.
The cluster can now be created on the primary cluster node (not on all servers!). This depends on the starting order of the MongoDB services, in this case server1. This server logs in to the Mongo shell with Workflow:PRIMARY>.
Now open a command line on server1 with administrator rights.
Go to the bin directory of the MongoDB installation (<installation_path>\MongoDB\bin).
Now add server2 and server3 to the replica set (rs). To do this, enter the following lines (and confirm each line with Enter).
Connect to the workflow database:
- mongo workflow
Something like this appears:
MongoDB shell version: v3.6.3
connecting to: mongodb://127.0.0.1:27017/Workflow
...
>
Initialize replica set:
-
rs.initiate()
Something like this appears:
{
"info2" : "no configuration specified. Using a default configuration for the set",
"me" : "server1:27017",
"ok" : 1
....
Adding cluster nodes:
- rs.add("server2:27017")
- rs.add("server3:27017")
Instead of server2 and server3, use the two computers on which only RabbitMQ and MongoDB have been installed. Something like this appears for each:
{ "ok" : 1 }
You can check the cluster by calling up the status. One cluster node must be labeled PRIMARY, the other cluster nodes must be labeled SECONDARY.
MongoDB independently determines which nodes are PRIMARY and which are SECONDARY (there is no "master" cluster node in MongoDB).
- rs.status()
Something like this appears:
{
"set" : "Workflow",
"date" : ISODate("2017-11-06T12:46:14.861Z"),
"myState" : 1,
"term" : NumberLong(1),
"heartbeatIntervalMillis" : NumberLong(2000),
"members" : [
{
"_id" : 0,
"name" : "server1:27017",
"health" : 1,
"state" : 1,
"stateStr" : "PRIMARY",
"uptime" : 6123,
"optime" : {
"ts" : Timestamp(1509966526, 1),
"t" : NumberLong(1)
},
"optimeDate" : ISODate("2017-11-06T11:08:46Z"),
"electionTime" : Timestamp(1509966314, 2),
"electionDate" : ISODate("2017-11-06T11:05:14Z"),
"configVersion" : 3,
"self" : true
},
{
"_id" : 1,
"name" : "server2:27017",
"health" : 1,
"state" : 2,
"stateStr" : "SECONDARY",
"uptime" : 5936,
"optime" : {
"ts" : Timestamp(1509966526, 1),
"t" : NumberLong(1)
},
"optimeDate" : ISODate("2017-11-06T11:08:46Z"),
"lastHeartbeat" : ISODate("2017-11-06T12:46:13.691Z"),
"lastHeartbeatRecv" : ISODate("2017-11-06T12:46:14.150Z"),
"pingMs" : NumberLong(0),
"syncingTo" : "W2012DEV4:27017",
"configVersion" : 3
},
{
"_id" : 2,
"name" : "server3:27017",
"health" : 1,
"state" : 2,
"stateStr" : "SECONDARY",
"uptime" : 5847,
"optime" : {
"ts" : Timestamp(1509966526, 1),
"t" : NumberLong(1)
},
"optimeDate" : ISODate("2017-11-06T11:08:46Z"),
"lastHeartbeat" : ISODate("2017-11-06T12:46:14.578Z"),
"lastHeartbeatRecv" : ISODate("2017-11-06T12:46:10.127Z"),
"pingMs" : NumberLong(0),
"configVersion" : 3
}
],
"ok" : 1
}
In the installation directory of MongoDB (e.g. <installationpath>\MongoDB), create a text file named key.txt. This file serves as a preshared secret for the MongoDB services among themselves. Specify a key-like, random string of letters and numbers (between 6 and 1024 characters) in this file, for example:
-
w4u5zoawer9wz78raow83zoawze2ri6uazvbuiwer
Do not use spaces or special characters in the key string (only letters and numbers with 6 to 1024 characters). The key string created must be identical in all key.txt files on all cluster nodes (server1, server2 and server3).
The key file generated above must be specified and authentication must be enabled in the configuration of MongoDB.
Add the following lines at the end of the configuration file mongod.cfg (in the directory <installationpath>\MongoDB):
security:
keyFile: <Installationpath>\MongoDB\key.txt
authorization: enabled
Replace <installationpath> with the actual installation path of your IQ4docs installation.
The mongod.cfg must not contain any empty lines or tabs (except at the very end).
For the settings made so far to take effect, the MongoDB services must be restarted.
Manual adaptations still need to be made after the installation of all cluster nodes.
- In the LocalService.config of the ConfigService of all cluster nodes, specify the hostnames of all cluster nodes (separated by commas) for MongoDbHost and RabbitMQHost. You will find the file in the installation directory in the subdirectory ConfigService (e.g. C:\Printsystem 4\ConfigService\LocalService.config).
- <add key="MongoDbHost" value="server1,server2,server3"/>
<add key="RabbitMqHost" value="server1,server2,server3"/>
- Specify the new cluster node in the Server (Cluster Nodes) area in the system area, see System Areas.
After the setup, restart all computers involved.